Welcome to this new tutorial on how to build with gulp. I am certain many of you would be wondering the meaning of the word build used in the title of this tutorial.
In fact, in any process of creating a website you usually have to create some set of files and folders to match the desired architecture that feats the most your project. In that case you have to take care of compressing and minifying your css and your javascript, optimizing your images and a whole lot of stuffs you must consider to make your site well optimized.
Plus, while your are coding there are many repetitive actions you often do like refreshing your pages to see the effect of changes you've made. All these is really tedious and a complete waste of time. Imagine you have a system that does all this for you. Image when you save any changes in you css file, it creates its minified version, and does the same with your javascript file. Have a look at things you can automatically do with gulp below:
- Minify your css
- minify your javascript
- compress and optimize your images
- compile your sass, coffeescript, jade files
- automatically reload your browser, instead of refreshing manually with f5
- etc
What is a build system?
Basically, a build system is a set of tasks runners(package managers, preprocessors and build tools) used to automate frequent tasks during a designing/development process.
Meaning, from compiling, minifying, optimizing, reloading, to uploading remotely, etc you wouldn't have to do it by yourself. All you need to do is to create some little code that will do the job for you: this codes are called tasks.
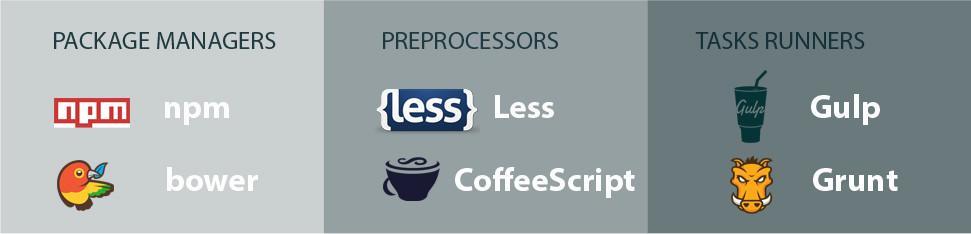
For all front-end libraries you may need such as: jQuery, backbone, angularJs, etc, it won't be a problem again managing them. You will use what is called package managers which will take care of them for you. Package Managers could download them into your project folders and if needed, inject them in your source code; not great?!
With the rise of preprocessing languages like Sass, CoffeeScript, TypeScript, Jade, it becomes easy to benefit from the hidden power of some native languages like css. So, instead of you writing raw css, you can use Sass to write it in a more powerful way. After you've writing your css with Sass, you have to compile/transform it into normal css so that your browser can understand it. So this process can also be handle as automate task.
So, after you've writing or while you are writing your css with sass, your javascript using CoffeeScript or TypeScript, your HTML with Jade, you will define tasks that will consider compiling them into their respective native programming languages; you will also write tasks that will take care of managing your front-end packages as mentioned above. But, the task alone is not enough we need task runner that could say "Ok, we have so so job/task to do, let's run them".
That's where Task Runner come in. We actually have two well-know task runners: Grunt and Gulp.
In this tutorial, we will be using gulp, and there is a reason for that. One thing you should know is that gulp is not the only build system available. Before gulp there was Grunt. For a moment, Grunt was the favorite but for some reasons people prefer Gulp to Grunt today.
Some main reasons people cite when it comes to why the prefer Gulp to Grunt are:
Grunt
- Grunt is too verbose
- Geeky learning curve
- A lot of configuration to do
Gulp
- Gulp is fast
- Gulp is easy to learn
- Gulp priorities code over configuration
So, here I am going to talk of gulp build system. In case you would like to read more about Grunt, you can go here.
So, I can redefine a build system as a combination of technologies that can favorite the automation of some common tasks during a development.
Set up a build system with gulp task runner
Here let's try to put together a simple build system. What the system will be doing is simple, every time we write something in our css file, it will minify the css and save the minified copy in a specific folder.
In order to make that, you need to equip yourself with some tools: nodejs, npm(node package manager), Gulp.
Note: You should know how to start you command line program - cmd/cmder on windows and Terminal on Linux. You should also know how to move from folder to folder or how to create folders and files with the command line.
Install NodeJs
To install it, head to the official web site: nodejs.org. Depending on your operating system, it will suggest the correct file to install, easy!
After installation make sure you have it. Open up you command line and enter node -v. If you see the nodejs version, then it is ok.
Install NPM
By the way, npm is a the manager of all packages developed under NodeJS. Since you will need those packages, we need the manager.
I will not repeat the whole process here, I would like you to go here: https://github.com/npm/npm and install it according to your operating system.
Once that is done you can verify but typing npm -v in you terminal. Here too if you see the version, it means everything is ok.
Before installing gulp, we have to set up our project folder. I have a project structure like following:
- Build
- index.html
Install Gulp
First we need to install Gulp globally in our computer, so that our computer can be aware of its presence. So run the following command to install Gulp globally:
npm install --global gulpYou may need to use
sudoon linux OS
Since Gulp is a nodejs's package, we need to set up the node packages settings file called package.json. This file will allow node to know what are the packages we need in our project.
So go in your project folder and create the `package.json' file. Open it up and just enter this:
{

}
You could also create the file by running npm init and say yes to all steps.
Now your folder should look like this:
- Build
- index.html
- package.json
In order to install Gulp, cd to your project folder. In my case:
$ cd ~/
$ cd web
$ cd build
I am using Ubuntu, and my root folder is located in a folder called web. In that folder I created my Build folder for our project.
On Window, it could be something like: cd c:\wamp\www\Build
Next, run the following command to ask npm to set up/install a copy of Gulp in your current project as a needed package.
npm install --save-dev gulpAfter that, open the file package.json with you favorite text editor. You will see something similar to this:
{

"devDependencies": {

    "gulp": "^3.8.11"

    }
}
If you created package.json with npm init you should see more information in there, but that isn't what we are interested in, what we are looking up to is this part of the file.
That shows that Gulp has been added to our current project as dependency. The version is 3.8.11, the most recent one.
After running this command successfully, a new folder(node_modules) will be added to you main folder. So your folder should look like this now:
- Build/
- index.html
- package.json
- gulpfile.js
- node_modules/
- gulp/
- ...
- gulp/
Create your first Gulp task
Now that your required tools are well installed, we can start the real work. We want to create our tasks (minify css).
In order to tell Gulp what tasks it should run, we need to create a special file that will contain/list those tasks -the file is named gulpfile.js.
So, let's go back to our project folder and create the gulpfile.js file. After that your folder should look like this:
- Build
- index.html
- package.json
- gulpfile.js
Before Gulp runs our tasks, he also requires some other tools(packages) to help him. In gulp system, there is almost a task for anything you can think of(You can browse packages here https://www.npmjs.com/).
So we will edit our gulpfile,js and add the list of all packages/dependencies we need. For our goal (minify css) we need a package called gulp-minify-css.
To list them in our gulpfile.js, we won't need to open the file with a text editor, we just need to run following command:
npm install --save-dev gulp-minify-cssAfter that your node_model folder will change again and look like:
- Build/
- index.html
- package.json
- gulpfile.js
- node_modules/
- gulp/
- gulp-minify-css/
That means we are ready to start. Now open your gulpfile.js file with your text editor and add the following code:
var gulp = require('gulp');

var minifyCss = require('gulp-minify-css');

gulp.task('mincss', function(){

    var fb = gulp.src('main.css');

        fb.pipe(minifyCss());

        fb.pipe(gulp.dest('main'));

        return fb;
});
To test this and see what exactly it does you need to create a css file. let's create that css file at the root of our project and name it main.css and open it with your text editor. Your folder should look like this now:
- Build/
- index.html
- package.json
- gulpfile.js
- node_modules/
- gulp/
- gulp-minify-css/
- main.css
Enter the following code in your css file:
body{
    margin:0;
    padding:0;

    background-color:teal;
}
At this point nothing serious is happening. Now start your command line application(Terminal). Now cd to your project root and enter the following command:
gulp mincssA new folder called main should appear in you project with a file main.css within. If you open that file you should see your css minified inside. I get this in my case:
body{margin:0;padding:0;background-color:teal}Looks great!
Explanation of what really happened
This happened so fast that you couldn't see what really happened, and if I don't explain you would hate me, lol.
Actually, as you could have noticed it, the gulpfile.js it what does that job. And if we consider it, it has two main sections:
The first one: requirement section
var gulp = require('gulp');

var minifyCss = require('gulp-minify-css');
This two lines import gulp and gulp-minify-css. it's like require() in PHP.
And the second one: tasks definition section
gulp.task('mincss', function(){

    var fb = gulp.src('main.css');

        fb.pipe(minifyCss());

        fb.pipe(gulp.dest('main'));

        return fb;
});
In here, let me drag your attention on something. This second section was writing this way to show (to beginner or those who are not used to javascript) the different lines in the code separately. In normal cases, you will be writing it like following, and that's how I will be doing next time:
gulp.task('mincss', function(){

        return gulp.src('main.css');

            .pipe(minifyCss());

            .pipe(gulp.dest('main'));

    });
This part takes the gulp.task() function and passes two parameters to it: the name we want for our task (mincss in my case) and a closure (function()).
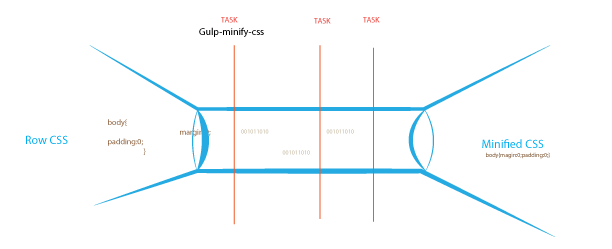
The body of that closure uses a concept called piping which allows you to pass data through many functions(a stream) and get it back at the end in a different form, like with a real pipe. You push water through it, you place a filter somewhere and when water passes, it gets filtered and the outcome is clean water.
So first we indicate to gulp the file we want to take through the pipe with:
gulp.src('main.css')then we take it through the minifyCss() function that will minify our css and send it to the next function:
.pipe(minifyCss());next we indicate to gulp where to place the minified css file:
.pipe(gulp.dest('main'));For those who prefer illustrations, you can get it better with following image:
Conclusion
This is just the top of the ice-berg. There is still a lot you can do. With the little assaignment we did, you can see that everytime you change your css file you have to come back to your terminal to run gulp mincss in order to get it minified. We need to automate that by watching any changes in our css file. When you press ctrl+s the file will be saved and minified automatically, and if possible pop up a notification.
In next tutorial I will be taking you through that and how we can compile sass files and reload our browser every time we save changes.
So, hope you loved this tutorial. Please like, tweet and share it. If you have any question, do not hesitate to write it down here as a comment below. Thanks.
Last updated 2024-01-11 UTC