Eclipse has always remained one of the most utterly gripping open-source IDEs when it comes to developing bespoke Android applications. Elevated by a great number of plugins, Eclipse captures the attention of developers simply because it makes possible for them to play around multiple programming languages. However, despite of its blockbuster features, Eclipse fails to offer native Android support. It somewhere lacks that portion of nice tools that allow webmasters to create competitive apps. This is something that has encouraged Android developers to opt for Android Studio because it wins where Eclipse is lagging behind.
Though Android Studio is in beta version right now, but it\'s still an IDE that deserves the attention of Android developers. For those who are still glued to Eclipse, might be wondering whether it is possible for them to complete their project and then delve into Android Studio- or whether there is any way to migrate their current project to Android Studio.
It is possible to migrate your existing Eclipse project to Android Studio. In this post, I m going to discuss the process of how to migrate from Eclipse to Android Studio. There are two ways to go about it, we will explore about both of them one by one.
-
Import Directly into Android Studio
This is the quickest and simplest method of migrating to Android Studio. With the help of an Android Studio importer, it allows you to make automatic changes to your Eclipse-based project, thus helping you to get the project up and running in no time. Some of these changes are replacing JAR files, local source components, and libraries using Gradle dependencies, and removing some source as well as binary libraries with the help of Maven-based dependencies. This gives you peace of mind as you don\'t need to indulge in any kind of manual process of maintaining them.
The Android Studio importer also re-organizes your project using all new Gradle directory layout.
-
Export from Eclipse
Performing this method is a hard nut to crack and it\'s time consuming as well. However, using it you can keep the structure of Eclipse directory as it is. There are various conditions under which you can go with this method. For example- if your project is performing multiple Eclipse-based mappings, and it\'s not possible for Android Studio importer to deal with these paths accurately.
Now let\'s see the migration process.
-
Export from eclipse and import it to Android Studio
Before starting this method, make sure whether Eclipse\'s ADT plugin is updated or not. For this just go to the \'Help\' menu and select \'Check for updates\'. If you see any updates, install them immediately and then follow the below mentioned steps.
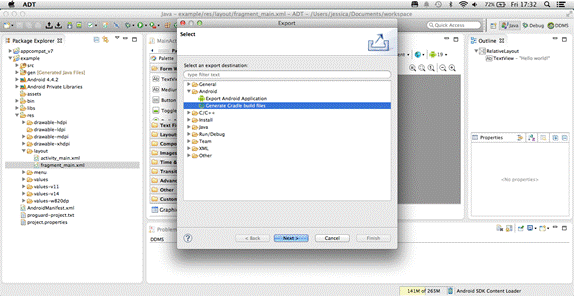
Select File > Export
After this, a new window will appear where you need to open the Android folder and select \'Generate Gradle build files\'. Then click Next.
Screen shot of the process
-
Now, pick up the project you wish to export and click on Next
-
You can now see an Export option using which you need to decide the modules which Eclipse is required to export. Once you go through all of them, click on Finish.
-
If everything goes well, you\'ll see an export successful message on your screen. It also shows you the path where Eclipse has preserved all the projects you\'ve exported just now. Make sure you note down this location somewhere.
-
Now, open Android studio. Go to the Welcome screen and select Import project.
-
Visit the location where all your projects are stored, select them to start importing.
Android Studio now starts importing your projects; wait for few seconds to make it work.
Import Project Directly into Android Studio
Before kickstart this method, it is important to know about the exact location of your current Eclipse project. If you know about it, then proceed to the following steps.
-
Start Android Studio. On the Welcome screen, select Import Project.
-
Go to the location where your Eclipse project is stored and click on Import.
-
You\'ll be receiving a message conveying about the importing process. Read it and then click on Next.
-
After this, Android Studio will present you with some options. Leave them as it is selected, and make sure you do not change them unless until you don\'t have any specific reason to do so.
After this step, the Android Studio will start importing your Eclipse project and will provide you an import summary with information about files that have been moved, their locations, JAR files, and libraries. Read this summary carefully as it consists some crucial information regarding the entire process.
To Conclude
I hope you\'ve now gained a pretty good understanding about the process of migrating from Eclipse to Android Studio. You can bookmark this page, so that you always remember about it.
Last updated 2023-12-11 UTC