Hi everyone, welcome to the second part of our tutorial on How to add Sign Up, Sign In and User Dashboard to a web site?. In this part of the tutorial, I will be showing you how you can add two very important options which are: Remember me and Forgot password.
In fact, these options are almost on all websites that consider membership. The Remember me option allows a user to log in the site once for a given time. So, if you log in today and ask the site to remember you, it will keep you logged in for a week or for some days, depending on the time defined by the website.
The other option, forgot password, allows a user to retrieve his password or create a new one in case he has lost/forgotten his password.
Basically these two options are very important for a website that implements a membership. If they are not implemented, you should be expecting your users to email you with problems related to it. So create those options will help you automate the job; especially the Forgot password. Even though the Remember me option is not that a big problem, it may be very useful to keep your users. We all usually signin in our gmail once for a while. So that whenever you want to check your emails, you just enter gmail.com and Gmail will log you in and redirect you to your inbox automatically.
It makes the work easy and pleasant to users. So let\'s see what we can do for our existing membership application.
What do we need?
Since we already have a sign up and sign in application, I will just add those options to it.
-
Remember me: For this option, we will add a check box to our sign in form. When a used checks it while signing in, we will keep him logged for a week. We will make that possible by using
cookies. Remember, the $_SESSION variables expires after some time and cookies don\'t.
-
Forgot password: To make this, I will be adding another link beside the Remember me button. When a user clicks it, it will take him to another page. That page will ask him to enter his email he used while signing up. We will then check the email and other conditions around it. Once everything is OK, we can send him a new password.

I will just be showing the little parts that change in our files. At the end I will show their full content. Also know you can also [download my source code]() to compare with yours.
The download of source code and .pdf formats is now free. You don\'t need to be a premium before downloading. So feel free to download.
The Remember me option
In order to complete this work, we\'ll be bringing some changes to our existing files.
- index.php
In the index file I\'ve just added a link for the Forgot password. So the code at that part of the file becomes this:
<div class=\"row\">
    <div class=\"col s5 offset-s1 right-align\">
        <input type=\"checkbox\" class=\"with-gap\" name=\"persist\" id=\"persist\"  />
            <label for=\"persist\">Remember me</label>
    </div>
    <div class=\"col s5 offset-s1 left-align\">
        <a href=\"forgot-password.php\">Forgot password?</a><br>
        <a href=\"signup.php\">New? Sign up here</a>
    </div>
</div>
We can see that for the \"Remember me\" option, I\'ve added a check box with the name persist. Then I added a link to a new page ( forgot-password.php ) that will be handling lost password issues. When the form is submitted, it\'s the log-user-in.php file that handles it. So we will go in log-user-in.php and handle this check box.
- log-user-in.php
Here is were things really happen. Anytime a user logs in, we always verify his credentials with the function signIn( $email, $password ). If the user\'s credentials are verified, we create a session for him with session::set(\'user_session\', $email);.
This time before we do that, we have to check if the user checked the persist check box. If he didn\'t then we just set his session as usual. but if he checks the persist check box, we set a cookie with setcookie() function before setting his session. This cookie will help our application to remember the user\'s decision for some while.
So, first let\'s take the state of the persist check box.
// Check if the user wants to be remembered
$persist = isset($_POST[\'persist\']); //will be true or false
If the check box is checked, $persist will be true else it will be false.
Next, we verify if the user\'s credentials are valid. If they are, we check if the persist is on true. If it\'s false, we\'ll just set his session normally. If it\'s true, we set a cookie on his computer then we create his session.
if ($Model->signIn( $email, $password ))
{
    // Verify if the user clicked on \"Remember me\" before creating the session
    if ($persist) {
        $hash = $Model->hash_password($email.$_SERVER[\'REMOTE_ADDR\']);
        setcookie(\'membership\', $email.\'#~#\'.$hash, time() + 3600 * 24 * 7, \'/\', \'\', false, true);
        session::set(\'user_session\', $email);
    }else{
        session::set(\'user_session\', $email);
    }

}else{
    session::set(\'login_issue\', \"Can\'t log you in. check your details.\");
}
Basically, there is no problem except these two lines:
$hash = $Model->hash_password($email.$_SERVER[\'REMOTE_ADDR\']);
setcookie(\'membership\', $email.\'#~#\'.$hash, time() + 3600 * 24 * 7, \'/\', \'\', false, true);
With the first line, I\'ve concatenated the user\'s email and his IP Address. Then I hashed the two together. Here, I just need a cryptogram out of the user\'s email and his password.
In the second line, I used a special function called setcookie() that helps us to create a cookie. To understand better what this line does, you really need to know how that function works. Bellow is its prototype:
bool setcookie ( string $name [, string $value [, int $expire = 0 [, string $path [, string $domain [, bool $secure = false [, bool $httponly = false ]]]]]] )So, the cookie I\'ve set is named membership. It\'s value is $email.\'#~#\'.$hash. It will expire in a week (time() + 3600 * 24 * 7). The path is set to the site\'s root and the domain is set to empty. The secure is set to false and the httponly to true.
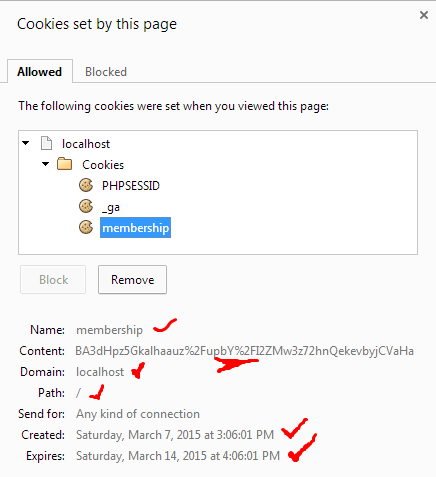
If everything is set fine and you sign in again ( do not forget to check the Remember me check box), you should be able to see something like this when you inspect your cookies in your browser:
Now it\'s left with creating the automatic connection. Since our cookies can be set, we need to auto-detect them and sign the user in whenever he visits the website.
To create the automatic logging in, we need to choose one of our files that is always accessed by our users. Then install the auto-detection of any request to our website. For that purpose, I used my includes/header.php file. This file is included in all pages, so it will make the deal.
- includes/header.php
Here is the auto detection of our cookies:
// automatic connection system
//if a cookie is set and the user is not actually connected
if( isset($_COOKIE[\'membership\']) && !isset($_SESSION[\'user_session\']) )
{
    // Get the user\'s email from the cookie
    $cookie = explode(\"#~#\",$_COOKIE[\'membership\']);
    $cookie_email = isset($cookie[0]) ? $cookie[0] : null;
    $cookie_hash = isset($cookie[1]) ? $cookie[1] : null;

    $userData = $Model->getUser( $cookie_email ) ;

    // We create a hash of the user email and his IP address like we did while creating the cookie with our hashing function
    $input = $cookie_email.$_SERVER[\'REMOTE_ADDR\'];

    if( $cookie_hash === crypt($input, $cookie_hash) ){
        // we use the email from our data base to set the session, not the one from the cookie
        $_SESSION[\'user_session\'] = $userData->user_email;

        // we set the cookie again to extend its expiration date
        setcookie(\'membership\', $cookie_email.\'#~#\'.$crypt, time() + 3600 * 24 * 7, \'/\', \'\', false, true);
    }else{
        // Otherwise, we unset the cookie by setting its expiration date to NOW
        setcookie(\'membership\', \'\', time() - 3600, \'/\', \'\', false, true);
    }
}
So, what it does is this. First check if we have our cookie left in the user\'s computer and the user is not actually having an opened session.
//if a cookie is set and the user is not actually connected
if( isset($_COOKIE[\'membership\']) && !isset($_SESSION[\'user_session\']) )
{
if that\'s the case, get the user\'s email from the cookie, get the secret hash from the cookie too.
// Get the user\'s email from the cookie
$cookie = explode(\"#~#\",$_COOKIE[\'membership\']);
$cookie_email = isset($cookie[0]) ? $cookie[0] : null;
$cookie_hash = isset($cookie[1]) ? $cookie[1] : null;
Retrieve the user\'s information from our database using his email
$userData = $Model->getUser( $cookie_email ) ;Concatenate the email from the cookie with the user\'s current IP Address. We do that to add some security measures. So that somebody shouldn\'t copy a cookie from a computer to another one.
$input = $cookie_email.$_SERVER[\'REMOTE_ADDR\'];Then we check if the hash of the new $input is equivalent to the one obtained when the user asked to remember him.
if( $cookie_hash === crypt($input, $cookie_hash) ){If the two hashes match, then it\'s the same user who is back. We can then connect him automatically and freshen his cookie\'s expiration date to the current date.
// we use the email from our data base to set the session, not the one from the cookie
$_SESSION[\'user_session\'] = $userData->user_email;

// we set the cookie again to extend its expiration date
setcookie(\'membership\', $cookie_email.\'#~#\'.$crypt, time() + 3600 * 24 * 7, \'/\', \'\', false, true);
Basically this is it. Now we need to handle the cookie again when the user signs out.
So let\'s head over to the logout.php file and add some little code in it.
-
logout.php
if (isset($_SESSION[\'user_session\'])) {
    session::destroy(\'user_session\');

    // We also unset the cookie
    if( isset($_COOKIE[\'membership\']) )
    {
        setcookie(\'membership\', \'\', time() - 3600, \'/\', \'\', false, true);
    }

    // Redirect with header()
    if (!headers_sent()){
        header(\"location:index.php\");

    }else{
        // if header() is already sent use javascript to redirect
        echo \'<script type=\"text/javascript\">\';
        echo \'window.location.href=\"index.php\";\';
        echo \'</script>\';
        echo \'<noscript>\';
        echo \'<meta http-equiv=\"refresh\" content=\"0;url=\'.$url.\'\" />\';
        echo \'</noscript>\';
    }

}
What we do here too is simple. after unsetting the session, we check if the user has a cookie hanging. If that\'s the case, we set its expiration date to now. What kills the cookie instantly. So when the user comes back another time, the site will not log him automatically because he logged out by himself. If he doesn\'t and just close the browser, every time he come on the website he will automatically be connected until the expiration date of the cookie.
In this code I choose to keep the user\'s email and his IP Address in the cookie. Note that isn\'t a standard. You have to choose your own way of keeping your user\'s data in cookies. Remember to consider the encryption of the cookie. It\'s one thing to consider seriously. That\'s why I used my hash_password() function to encrypt the cookie. You can always do better for your users.
The Forgot password option
As I said earlier, when a user wants a new password, we\'ll ask him his email. We verify if such email exists in our database. If that\'s the case, we generate a temporal password and send it to that email.
In most cases, this way may be a big problem if good care is not taken. In my case whenever I use this method I always give another option to my users to change the temporal password once they log in.
The best way, as far as I am concerned, is to allow the user to enter a new password by himself through a secured page.
In this tutorial I\'ll be using the first method. It\'s just to show you how that works.
So, let\'s start. We start from a page named forgot-password.php. In this page I will be insert a simple form where the user could just enter his email.
- forgot-password.php
Likewise the index.php and signup I will include a processing file (recover-password.php) in the forgot-password.php file. That included file will be in charge of processing the form when it\'s submitted.
So the file will look like:
<?php
    require __DIR__. \'/includes/header.php\';
    require __DIR__. \'/includes/recover-password.php\'; //kind of controller for the login
    if(isset($_SESSION[\'user_session\']) )
    {
        if (!headers_sent()){
            header(\"location:dashboard.php\");

        }else{
            echo \'<script type=\"text/javascript\">\';
            echo \'window.location.href=\"dashboard.php\";\';
            echo \'</script>\';
            echo \'<noscript>\';
            echo \'<meta http-equiv=\"refresh\" content=\"0;url=\'.$url.\'\" />\';
            echo \'</noscript>\';
        }
    }

?>

<div class=\"row\">
    <div class=\"col s12 offset-s1 m12 l12 teal lighten-5\">
        <div class=\"center-align\">
            <h3>Recover lost password</h3>
            <p>Please enter your email bellow to receive a new password</p>
        </div>

        <form class=\"col s12\" action=\"<?= $_SERVER[\'PHP_SELF\'] ?>\" method=\"post\">
            <div class=\"row\">
                <span class=\"red lighten-5\"><?= isset($_SESSION[\'pwd_issue\']) && !empty($_SESSION[\'login_issue\']) ? $_SESSION[\'login_issue\']: \'\'?></span>
                    <?php session::destroy(\'pwd_issue\') ?>

                <span class=\"green lighten-2\"><?= isset($_SESSION[\'confirmation\']) && !empty($_SESSION[\'confirmation\']) ? $_SESSION[\'confirmation\']: \'\'?></span>
                    <?php session::destroy(\'confirmation\') ?>

                <div class=\"input-field col s10 offset-s1\">
                    <input type=\"email\" name=\"email\" id=\"email\" class=\"validate\">
                    <label for=\"email\">Your email</label>
                    <span class=\"red lighten-5\"><?= isset($_SESSION[\'error_email\']) && !empty($_SESSION[\'error_email\']) ? $_SESSION[\'error_email\']: \'\'?></span>
                    <?php session::destroy(\'error_email\') ?>
                </div>

                <div class=\"center-align\">
                    <button class=\"waves-effect waves-light btn\">Send</button>
                </div>
            </div>
        </form>
    </div>

</div>
<?php require DIR. \'/includes/footer.php\'; ?>
-
recover-password.php
<?php
$dbhandler = new Config() ;
$Model = new Model($dbhandler);

if ( isset($_POST) && !empty($_POST) )
{
if ( !$return = $Model->validateForm($_POST)  )
{
    $email      =  filter_var($_POST[\'email\'], FILTER_SANITIZE_EMAIL);

    // If the email is not in our database
    if ($Model->emailAlreadyUsed($email))
    {
        if (!empty($email))
        {
            if (filter_var($email, FILTER_VALIDATE_EMAIL))
            {
                // We can generate a new password for him and send it to him
                $newPassword = $Model->generateTemporalPassword( 8 ) ;
                if ($Model->sendNewPassword($email, $newPassword))
                {
                    session::set(\'confirmation\', \'A new password is been sent to your email. Remember to change it once you log in.\');
                }else{
                    session::set(\'pwd_issue\', \'New password could not be sent\');
                }

            }else{
                session::set(\'error_email\', \'Email is invalid.\');
            }
        }else{
            session::set(\'error_email\', \'Please provide your email.\');
        }

    }else{
        session::set(\'error_email\', \'This email is not in our system.\');
    }

}else{
    foreach ($return as $field => $error) {
        session::set($field, $error);
    }
}
}
Let me explain a bit what is happening in this file
First we collect the entered email
$email = filter_var($_POST[\'email\'], FILTER_SANITIZE_EMAIL);Then we check if the email exists in our users tables
// If the email is not in our database
    if ($Model->emailAlreadyUsed($email))
    {
Then we check if the email is not empty (This is not necessary at this point) and the email is a valid email.
if (!empty($email))
{
    if (filter_var($email, FILTER_VALIDATE_EMAIL))
    {
if all these conditions are fulfilled, we generate a new password of 8 characters
/ We can generate a new password for him and send it to him
$newPassword = $Model->generateTemporalPassword( 8 ) ;
Then we send the password to that email
if ($Model->sendNewPassword($email, $newPassword))
{
So basically, it\'s something simple. But as usually, you always have to think of security measures so that your application doesn\'t get hacked.
To avoid making this page too long, I suggest you download the source code to see the full content of each file.
Conclusion
Too long but necessary. I hope this tutorial helped you understand how these two options can be added to a website. If you face any issue just write it down here as a comment, i will be pleased to reply.
Last updated 2024-01-11 UTC